Interacting with Homebrew from Go
Today we will build a simple Go program that works with Homebrew. The tutorial is beginner-friendly and I will show you how to interact with terminal commands and build a basic TUI1. Please note though that this is not a full tutorial on TUI, but rather a simple example of how to use TUI in Go. If you want, you can expand this application further.
Prerequisites
Before we begin, make sure you have everything installed and prepared:
- Go
- Homebrew
- A terminal application (such as iTerm2, kitty or any other you like)
- A code editor or IDE of your choice
But wait, what is Homebrew?
Homebrew is a command line package manager for macOS (and Linux). It allows you to easily install and manage software packages on your system. It is widely used by us, developers, to install and manage software dependencies and tools.
For example, you can install Go by simply typing brew install go. This installs the latest version of Go on your system along with any dependencies that may be required.
Getting Started
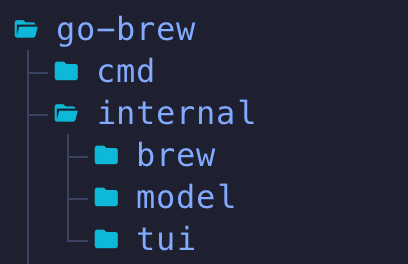
First and foremost, we need to create necessary directories and initialize a new Go module. To create a structure, you can use any method you like (command line, IDE, etc.), but I will be using the command line for this tutorial. So, to create a structure, run the following command:
mkdir -p go-brew-tutorial/{cmd,internal,internal/brew,internal/tui,internal/model}
Then we need to initialize a Go module. There is a simple command for that (do not forget to switch into the project directory first):
go mod init go-brew-tutorial
If you want, you can create README.md file and add some information about your project.
Models
Our first step will be to create necessary models for the project. For this we need two structs and a couple of helpful functions to interact with them.
All models will be stored in internal/model directory. So, you need to create a new file /internal/model/models.go.
Let’s start with a simple things - declare our model and imports:
1package model
2
3import (
4	"fmt"
5	"strings"
6)
Our very first struct will be FormulaVersion. This is a simple struct that will be used later to store additional information about a formula.2
1type FormulaVersion struct {
2	Stable string `json:"stable"`
3	Head   string `json:"head"`
4	Bottle bool   `json:"bottle"`
5}
The second struct holds detailed information about a formula:
 1type Formula struct {
 2	Name              string         `json:"name"`
 3	FullName          string         `json:"full_name"`
 4	Description       string         `json:"desc"`
 5	License           string         `json:"license"`
 6	Homepage          string         `json:"homepage"`
 7	Deps              []string       `json:"dependencies"`
 8	InstalledVersion  string         `json:"-"`
 9	AvailableVersions FormulaVersion `json:"versions"`
10	IsSynced          bool
11}
IsSynced field helps us track if we have already updated the formula data or not. Note that we do not have json tag on this field as it is not part of the JSON response.
After this, we have created all the necessary models and now we can move on to the functions. We start from one that checks if the formula needs to be updated (if our installed brew formula is outdated).
1func (f *Formula) NeedUpdate() bool {
2	return !strings.EqualFold(f.InstalledVersion, f.AvailableVersions.Stable)
3}
Then we need to create another function, helper one, that will provide us with a colorful output 3.
1func coloredTextUpdateStatus(f *Formula) string {
2	installedVersion := fmt.Sprintf("%s [green::b]✓[-:-:-:-]", f.InstalledVersion)
3
4	if f.NeedUpdate() {
5		installedVersion = fmt.Sprintf("%s [red::b]![-:-:-:-]", f.InstalledVersion)
6	}
7
8	return installedVersion
9}
Lastly, a function that returns a slice of data fields (name, description, license, etc.). It also merges all the dependencies into a single line separated by commas.
 1func (f *Formula) Fields() []string {
 2	formItems := []string{
 3		f.Name,
 4		coloredTextUpdateStatus(f),
 5		f.AvailableVersions.Stable,
 6		f.Description,
 7		f.License,
 8		fmt.Sprintf("[:::%s]%s[-:-:-:-]", f.Homepage, f.Homepage),
 9	}
10
11	deps := "-"
12	if len(f.Deps) > 0 {
13		deps = strings.Join(f.Deps, ", ")
14	}
15	formItems = append(formItems, deps)
16
17	return formItems
18}
Homebrew
Now it comes to the most interesting part - the Homebrew module. This module will be responsible for interacting with Homebrew locally and getting the information about the formula. We will be using os/exec package to run the command line commands and get the output.
This work will be done in /internal/brew/brew.go file and we start from the package declaration and imports:
 1package brew
 2
 3import (
 4	"encoding/json"
 5	"fmt"
 6	"go-brew-tutorial/internal/model"
 7	"io"
 8	"net/http"
 9	"os/exec"
10	"strings"
11)
Our first function is GetFormulaById. It simply takes two arguments - a pointer to a slice of Formula and a string with the name of the formula. It will return a pointer to the Formula struct if it finds it in the slice, or nil otherwise.
1func GetFormulaById(formulas *[]model.Formula, name string) *model.Formula {
2	for _, f := range *formulas {
3		if strings.EqualFold(f.Name, name) {
4			return &f
5		}
6	}
7	return nil
8}
Next function is a little more complex as we have to work with network. It is used to get all the formulas available directly from Homebrew endpoint.
 1func LoadFormulasInfo() (*[]model.Formula, error) {
 2	resp, err := http.Get("https://formulae.brew.sh/api/formula.json")
 3	if err != nil {
 4		return nil, fmt.Errorf("failed to get formula info: %v", err)
 5	}
 6	defer resp.Body.Close()
 7
 8	if resp.StatusCode != http.StatusOK {
 9		return nil, fmt.Errorf("unexpected status code: %v", resp.Status)
10	}
11
12	body, err := io.ReadAll(resp.Body)
13	if err != nil {
14		return nil, fmt.Errorf("failed to read response body: %v", err)
15	}
16
17	var formulas []model.Formula
18	if err := json.Unmarshal(body, &formulas); err != nil {
19		return nil, fmt.Errorf("failed to unmarshal response body: %v", err)
20	}
21
22	return &formulas, nil
23}
And the hardest one. This function is used to get the list of installed formulas on your system. It uses brew list --formula --versions command to get the list of installed formulas and their versions. It then parses the output and returns a slice of Formula structs or an error (if something went wrong). ReadCloser and ReadCloser are used to read the output of our command.
As we can get an error or an expecting output, we have to handle both cases. Also pay attention to closing the pipes after we are done with them.
The last part of the function is so called “parsing” part. It takes the output of the command and splits it into useful chunks. Then it splits each line into name and version. If there is no version, it sets it to empty string. Then it appends the formula to the slice of formulas.
If you want to get an idea of how the output looks like, you can run the command in your terminal: brew list --formula --versions.
 1func GetFormulasFromSystem() ([]model.Formula, error) {
 2	cmd := exec.Command("brew", "list", "--formula", "--versions")
 3
 4	var stdout io.ReadCloser
 5	stdout, err := cmd.StdoutPipe()
 6	if err != nil {
 7		return []model.Formula{}, err
 8	}
 9	defer stdout.Close()
10
11	var stderr io.ReadCloser
12	stderr, err = cmd.StderrPipe()
13	if err != nil {
14		return []model.Formula{}, err
15	}
16	defer stderr.Close()
17
18	err = cmd.Start()
19	if err != nil {
20		return []model.Formula{}, err
21	}
22
23	var resp []byte
24	resp, err = io.ReadAll(stdout)
25	if err != nil {
26		return []model.Formula{}, err
27	}
28
29	data := strings.Split(strings.TrimRight(string(resp), "\n"), "\n")
30	var formulas []model.Formula
31	for _, f := range data {
32		splits := strings.Split(f, " ")
33		name := ""
34		version := ""
35
36		if len(splits) == 0 {
37			continue
38		} else if len(splits) == 1 {
39			name = splits[0]
40		} else { //here might be more than 1 version
41			name = splits[0]
42			version = splits[1]
43		}
44
45		formulas = append(formulas, model.Formula{
46			Name:             name,
47			InstalledVersion: version,
48			IsSynced:         false,
49		})
50	}
51
52	return formulas, nil
53}
User interface
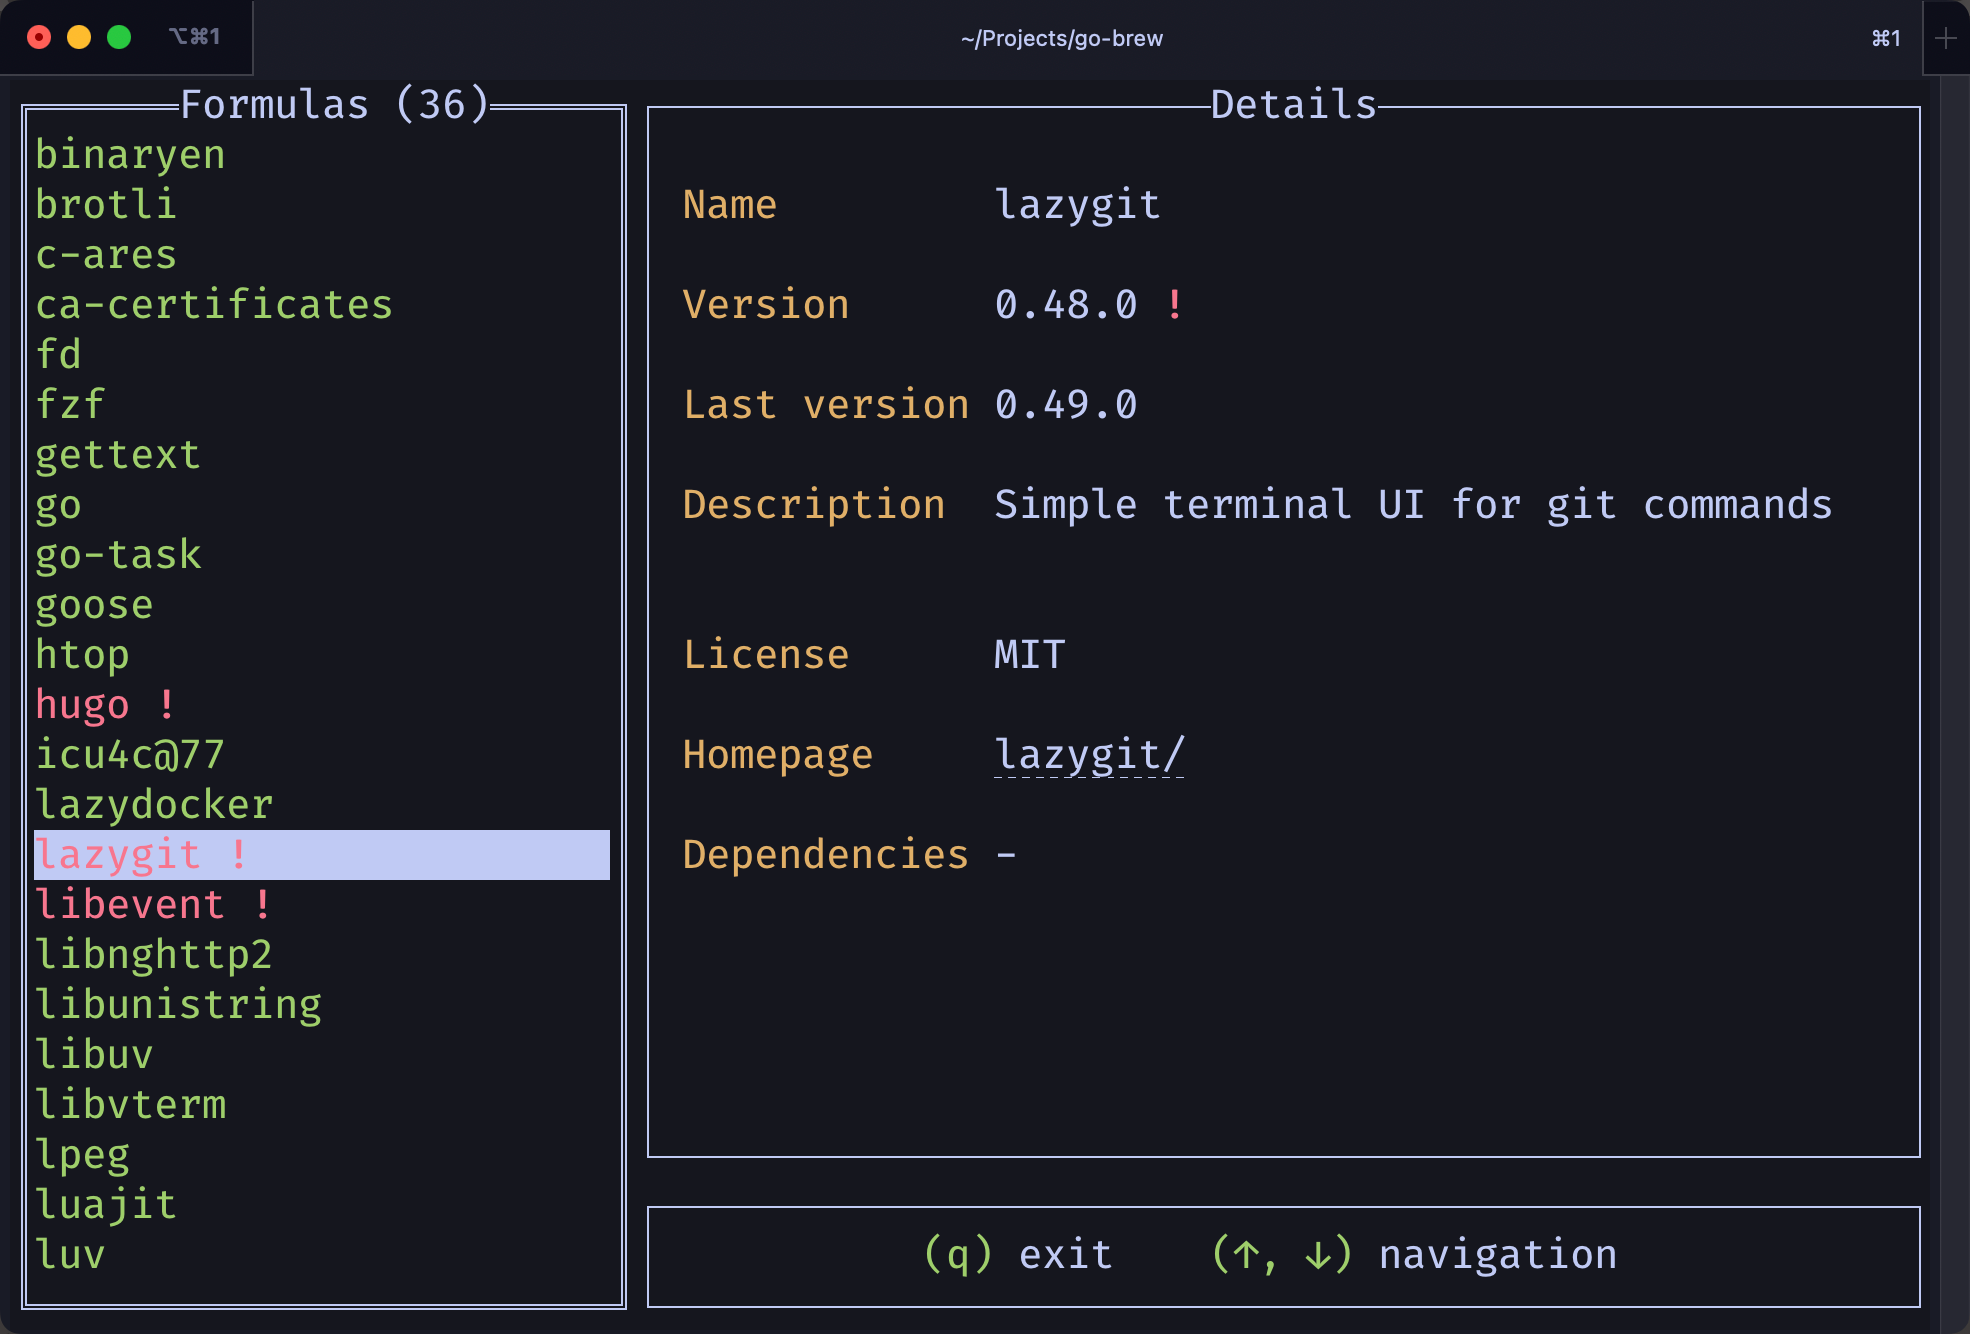
Now comes the most interesting part - the user interface. We will be using tview and tcell packages to create a simple TUI application.
To install the packages, simply do commands go get github.com/rivo/tview@latest and go get github.com/gdamore/tcell/v2@latest 4.
And as you might guess, we will be creating a single file for this module as well. So, create a new file /internal/tui/tui.go and add the package declaration and imports.
1package tui
2
3import (
4	"github.com/gdamore/tcell/v2"
5	"github.com/rivo/tview"
6)
We need a struct that will be available from the outside of our package. However, we want to expose only the necessary methods and not all of them. To achieve this, we need an empty struct that will be used in receiver functions.
type GUI struct{}
After this step we want to create 4 constants to store several data for our TUI - application, form, list and pages:
1var (
2	app   *tview.Application
3	form  *tview.Form
4	list  *tview.List
5	pages *tview.Pages
6)
From this point we can move towards other function in our user interface module and we start from “private” functions that won’t be available from the outside of our package. The first is for building a details part of the application - a right big part where all the detailed information about a selected formula is displayed.
 1func buildDetailsForm() *tview.Form {
 2	form := tview.NewForm().
 3		AddTextView("Name", "---", 0, 1, true, false).
 4		AddTextView("Version", "---", 0, 1, true, false).
 5		AddTextView("Last version", "---", 0, 1, true, false).
 6		AddTextView("Description", "---", 0, 2, true, false).
 7		AddTextView("License", "---", 0, 1, true, false).
 8		AddTextView("Homepage", "---", 0, 1, true, false).
 9		AddTextView("Dependencies", "---", 0, 3, true, false)
10	form.SetBorder(true).SetTitle("Details")
11
12	return form
13}
While SetBorder and SetTitle may be self-explanatory, I assume AddTextView may be a little confusing considering the number of arguments. Let’s peek into the function documentation:
1// AddTextView adds a text view to the form. It has a label and text, a size
2// (width and height) referring to the actual text element (a fieldWidth of 0
3// extends it as far right as possible, a fieldHeight of 0 will cause it to be
4// [DefaultFormFieldHeight]), a flag to turn on/off dynamic colors, and a flag
5// to turn on/off scrolling. If scrolling is turned off, the text view will not
6// receive focus.
7func (f *Form) AddTextView(label, text string, fieldWidth, fieldHeight int, dynamicColors, scrollable bool) *Form
We have a label and a title - those are obvious.
Then we have a field width and height. Those are used to set width and height of the text view.
The dynamic colors flag is used to turn on/off dynamic colors. If it is set to true, the text view will use dynamic coloring if it is specified (in a specific format).
The scrollable flag is used to turn on/off focusing - if it is set to true, the text view will be able to receive a focus.
Next one will help us to build a colored status bar.
1func buildStatusBar() *tview.TextView {
2	statusBar := tview.NewTextView().
3		SetText("[green](q)[-] exit\t[green](↑, ↓)[-] navigation").
4		SetDynamicColors(true)
5	statusBar.SetTextAlign(tview.AlignCenter).SetBorder(true)
6
7	return statusBar
8}
And here we have dynamic colors. For a simple visualization we have, it is enough. However, for a more complex projects you might need to learn more about coloring. For an overview and examples, you may check this link.
Long story short, there are a set of flags that can be used in order to achieve necessary output - [green]Hello[-], World! will print “Hello” in green and “, World!” in default color. Dash tag [-] is used to reset the color to default.
The next function we need to create will be used for modal dialog.
 1func buildLoadingModal() tview.Primitive {
 2	modalContent := tview.NewTextView().
 3		SetText("[green]Fetching[-] all the formulas...").
 4		SetDynamicColors(true)
 5	modalContent.SetBorder(true).SetTitleAlign(tview.AlignCenter)
 6
 7	modal := func(p tview.Primitive, width, height int) tview.Primitive {
 8		return tview.NewFlex().
 9			AddItem(nil, 0, 1, false).
10			AddItem(tview.NewFlex().SetDirection(tview.FlexRow).
11				AddItem(nil, 0, 1, false).
12				AddItem(p, height, 1, true).
13				AddItem(nil, 0, 1, false), width, 1, true).
14			AddItem(nil, 0, 1, false)
15	}
16
17	return modal(modalContent, 40, 3)
18}
Despite quite a big chunk of code, the logic is relatively simple. We create a text that will be displayed inside the modal. We use Flex to try to position the modal in the center of the screen.5
The next function we need is for building a list of formulas:
 1func buildList(listItemChanged func(int)) *tview.List {
 2	list := tview.NewList().
 3		SetHighlightFullLine(true).
 4		ShowSecondaryText(false).
 5		SetChangedFunc(func(index int, mainText, secondaryText string, shortcut rune) {
 6			listItemChanged(index)
 7		})
 8	list.SetTitle("Installed").SetBorder(true)
 9
10	return list
11}
Note listItemChanged(index) function call inside the SetChangedFunc - we pass this as an argument and we need it to update the details part of the application when the user selects a different formula from the list. That is a callback function. Every time a user selects something in the list, this callback will be called with the index of the selected item.
We did a good job but we still miss some things: a function to combine the whole UI as well as those receiver functions I mentioned earlier.
Here it comes - our “constructor” for the GUI struct.
 1func NewGUI(listItemChanged func(int)) *GUI {
 2	app = tview.NewApplication()
 3	form = buildDetailsForm()
 4
 5	list = buildList(listItemChanged)
 6
 7	layout := tview.NewFlex().
 8		AddItem(list, 0, 1, true).
 9		AddItem(tview.NewFlex().SetDirection(tview.FlexRow).
10			AddItem(form, 0, 3, false).
11			AddItem(buildStatusBar(), 3, 1, false),
12			0, 2, false)
13
14	pages = tview.NewPages().
15		AddPage("main", layout, true, true).
16		AddPage("modal", buildLoadingModal(), true, true)
17
18	app.SetInputCapture(func(event *tcell.EventKey) *tcell.EventKey {
19		switch event.Rune() {
20		case 'q':
21			app.Stop()
22		}
23		return event
24	})
25
26	return &GUI{}
27}
Here we build the whole layout of the application. We create a new application struct, we create a layout, we create pages and we add them to the application. We also set the input capture function that will be used to handle user input - “q” key to exit the application.
Pages are interesting thing though. They gives us a way to stack layouts on top of each other and we can then switch between them. In our application this is helpful because we do have a modal popup that we need to show/hide at a given period of time.
Last but not least, we need to create couple receiver functions to update the information in the application and to manipulate some of its elements.
 1// A simple wrapper function to initialize and run the application
 2func (g *GUI) Run() error {
 3	return app.SetRoot(pages, true).Run()
 4}
 5
 6// A function to hide the modal dialog
 7func (g *GUI) HideModal() {
 8	pages.HidePage("modal")
 9}
10
11// A function to update a title of the list view
12func (g *GUI) UpdateListTitle(title string) {
13	list.SetTitle(title)
14}
15
16// A function to add a new item to the list view
17func (g *GUI) AddListItem(name string) {
18	list.AddItem(name, "", 0, nil)
19}
20
21// A function to redraw the application
22func (g *GUI) Redraw(redrawFunc func()) {
23	app.QueueUpdateDraw(redrawFunc)
24}
25
26// A function to update description for a given selected list item (formula)
27func (g *GUI) UpdateDescriptionForField(pos int, text string) {
28	if textView, ok := form.GetFormItem(pos).(*tview.TextView); ok {
29		textView.SetText(text)
30	}
31}
Main!
We almost done, but without the main function we won’t be able to run our application. So, let’s create a new file /cmd/main.go and add the package declaration and imports.
1package main
2
3import (
4	"errors"
5	"fmt"
6	"go-brew-tutorial/internal/brew"
7	"go-brew-tutorial/internal/model"
8	"go-brew-tutorial/internal/tui"
9)
After this, add two constants to store necessary data:
1var (
2	gui      *tui.GUI
3	fullData []model.Formula
4)
Then, create a helper function that is needed for a list callback we discussed previously:
1func onListItemChanged(index int) {
2	if len(fullData) == 0 {
3		return
4	}
5
6	for i, item := range fullData[index].Fields() {
7		gui.UpdateDescriptionForField(i, item)
8	}
9}
We also need a function to fetch all the information and not to block any thread. We will be using a goroutine for this in a moment. But right now, let’s couple everything together in this function:
 1func fetchPackages() {
 2	installedFormulas, err := brew.GetFormulasFromSystem()
 3	if err != nil {
 4		panic(errors.New("failed to fetch installed formulas"))
 5	}
 6
 7	remoteFormulas, err := brew.LoadFormulasInfo()
 8	if err != nil {
 9		panic(errors.New("failed to fetch remote formulas"))
10	}
11
12	gui.Redraw(func() {
13		for _, r := range installedFormulas {
14			info := brew.GetFormulaById(remoteFormulas, r.Name)
15			updateRequired := false
16
17			if info != nil {
18				info.IsSynced = true
19				info.InstalledVersion = r.InstalledVersion
20				fullData = append(fullData, *info)
21
22				updateRequired = info.NeedUpdate()
23			} else {
24				fullData = append(fullData, model.Formula{Name: r.Name, IsSynced: false})
25			}
26
27			name := fmt.Sprintf("[green]%s[-]", r.Name)
28			if updateRequired {
29				name = fmt.Sprintf("[red]%s[-][red::b] ![-:-:-:-]", r.Name)
30			}
31
32			gui.AddListItem(name)
33		}
34
35		gui.UpdateListTitle(fmt.Sprintf("Formulas (%v)", len(installedFormulas)))
36		gui.HideModal()
37	})
38}
- Here we are getting all the formulas installed in the system
- Then we are loading all the formulas from the remote server
- Then we are iterating over the installed formulas and parsing the data so we can built a data structure needed for our application
- Then we update the list and hide the modal
Finally, the very last step - main function. Just 3 lines of code:
1func main() {
2	gui := tui.NewGUI(onListItemChanged)
3
4	go fetchPackages()
5
6	if err := gui.Run(); err != nil {
7		panic(err)
8	}
9}
We are done! Run your program and test it - go run cmd/main.go. You did good.
What next?
You can extend this application to add more features, such as:
- add a search functionality to filter the list of formulas
- add a feature to update the formula
- add a feature to remove the formula
- add a feature to install the formula
- and much more…
Source code
Source code for this tutorial is available on GitHub.
-
TUI stands for Text User Interface. It is a way to create a user interface that is based on text, rather than graphics. TUI is often used in command line applications, where the user interacts with the program using text commands and the program responds with text output. ↩︎
-
Formula is a package that contains the information about the software that is being installed. It contains the name of the software, version, dependencies and other information that is needed to install the software. Formula is used by Homebrew to install and manage software packages on your system. ↩︎
-
While this is not the best approarch for this function to be in this module, for the sake of simplicity we will be using this approach. In a real world application, you would want to separate the logic and decouple the code (for example, to move it out to TUI-based module). ↩︎
-
Alternatively, you can import the packages in your code and run
go mod tidyto install the packages. This will also remove any unused packages from your module which is helpful. ↩︎ -
Terminal (or Text) user interfaces can be overwhelming at first, but once you get used to them, they are very powerful and flexible. ↩︎